


Here's how we turned our Billy Bookcases into Billy Built-ins, kind of.
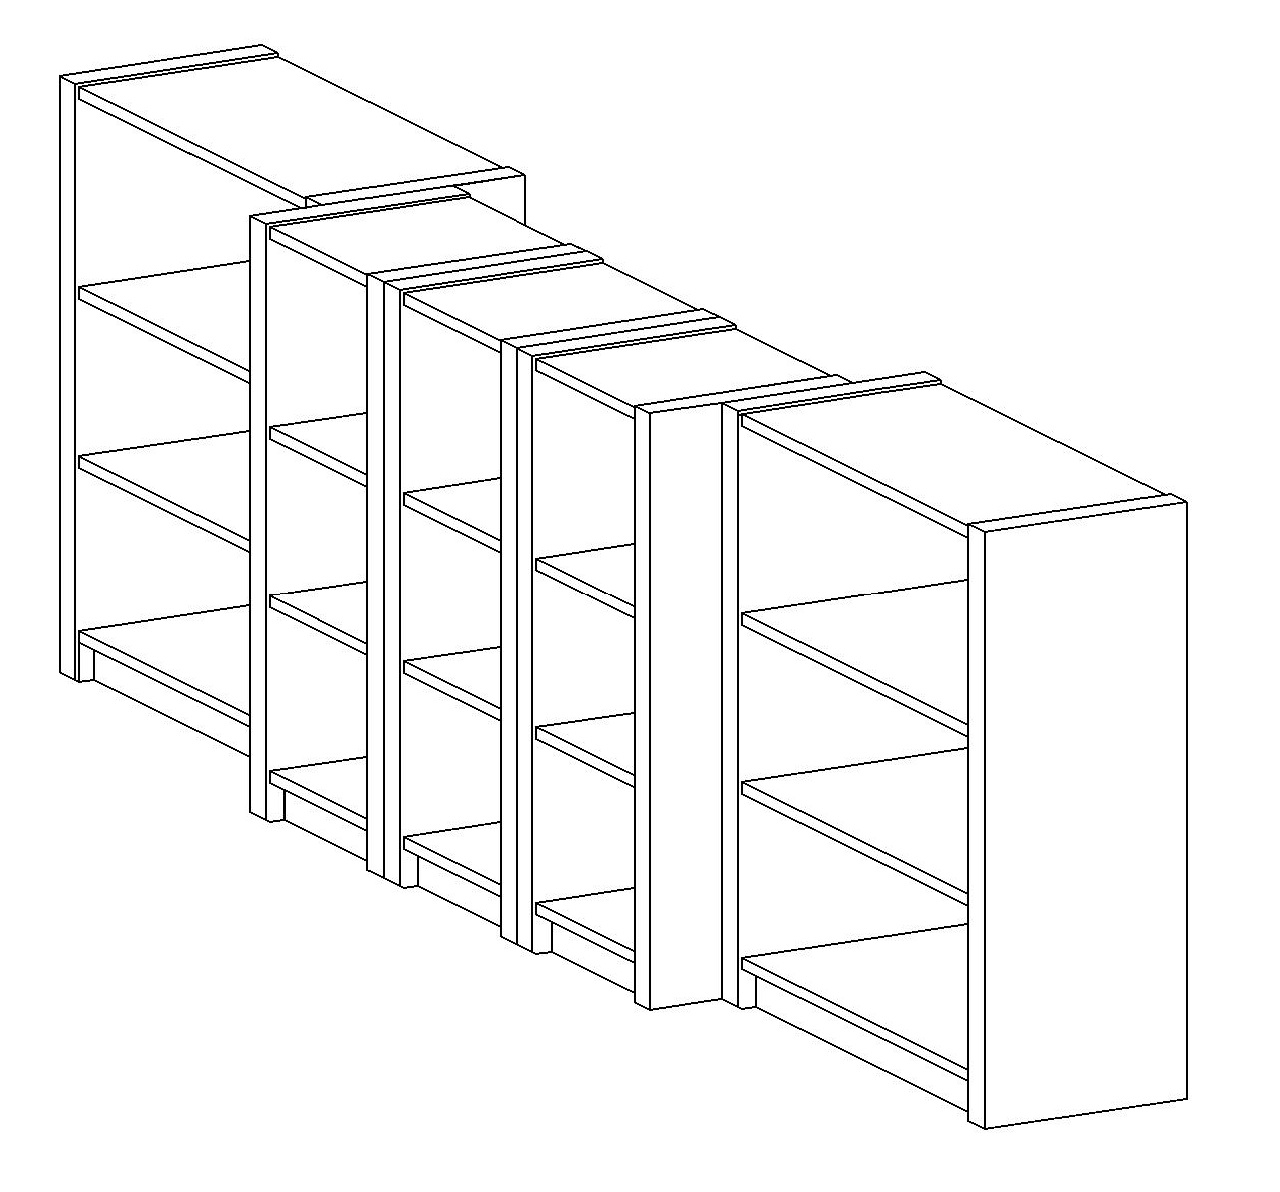
I wanted the sides to be recessed and the front to pop out a bit, I thought it would give it more interest, much better then just a line of bookcases against a wall.
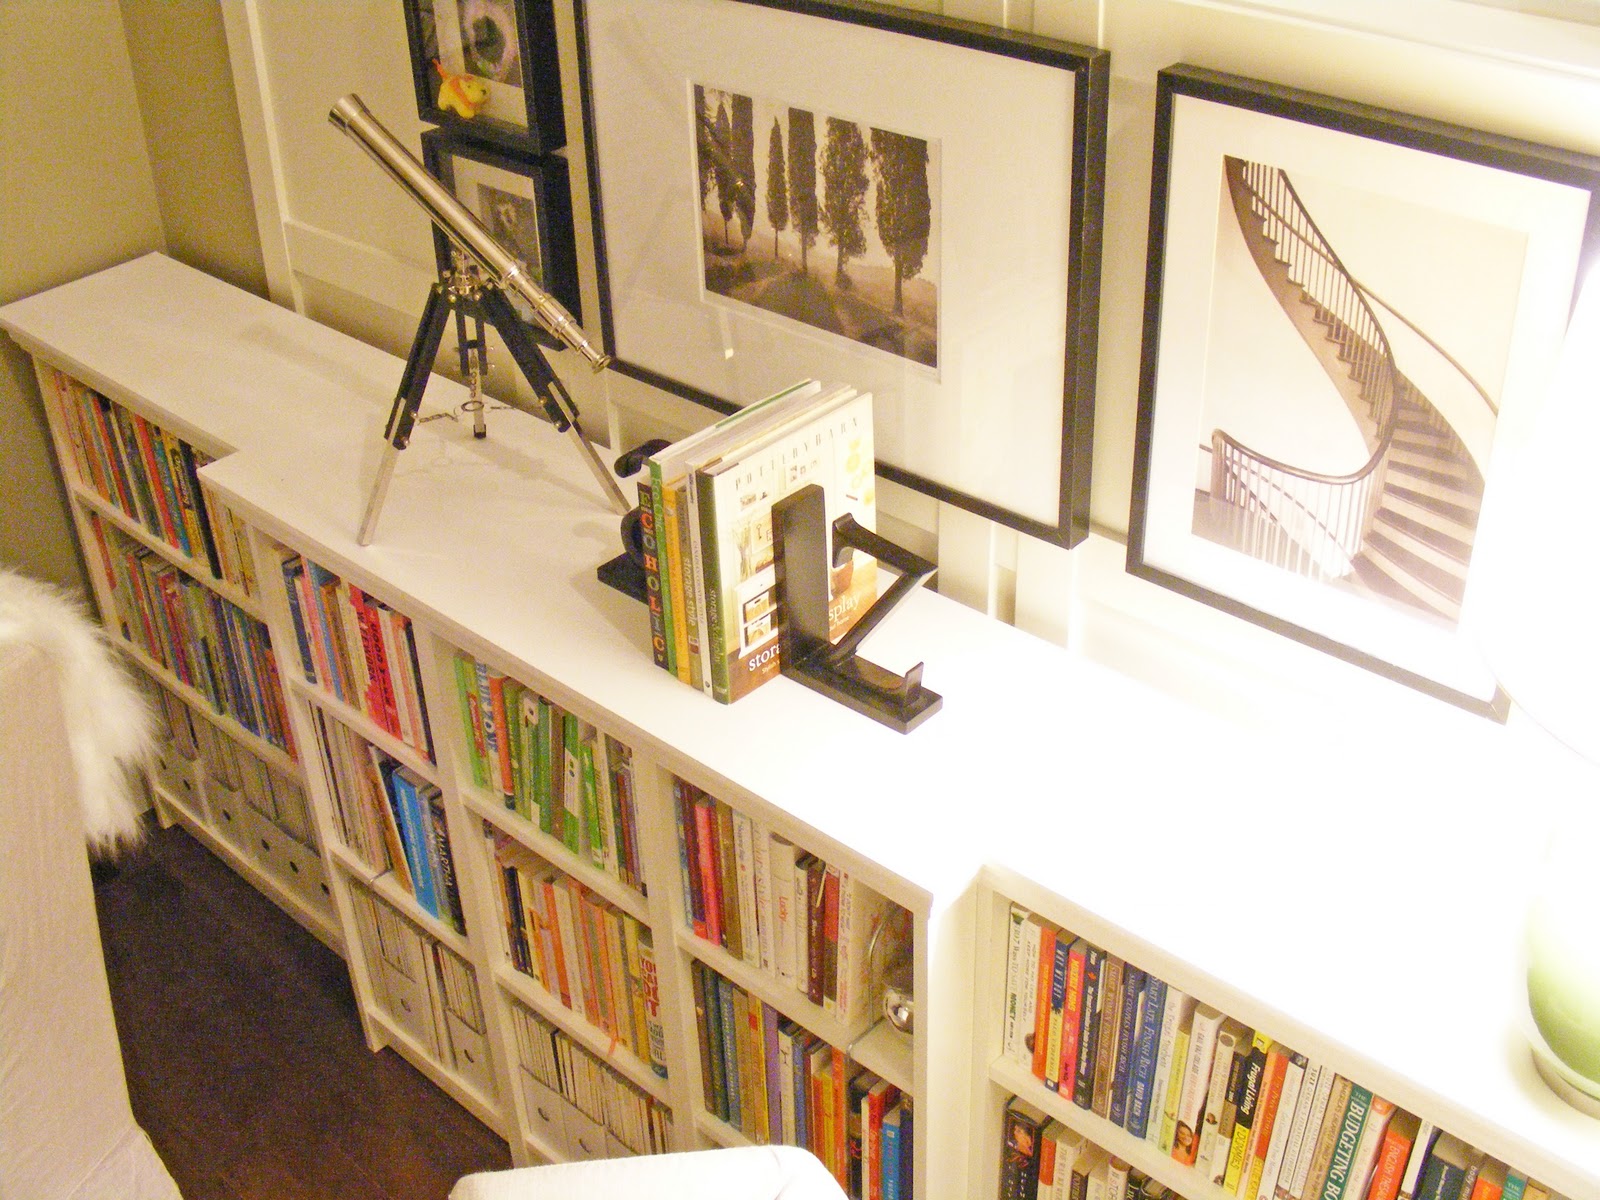
Here's what we did:
- We used two Full width billy bookcases, and three half width ones. Then we just pulled out the center three and Lee screwed them together.
- Then we used MDF for the top. Lee decided to use three smaller sheets of MDF instead of one large sheet because it was much cheaper and much easier to cut nice straight lines. We attached it in three sections:

- Once the top was glued and nailed into place, we attached the trim. We used a chair rail instead of crown molding (like in our townhouse bookcases) because it was much easier to work with, and gives the same look for approx. the same price.


- And our last step was to fill in all of the seams, sand and paint the top. We chose Martha Stewart's TALC color, it's not an exact match but it's pretty darn close.


This is great! Thanks for the tutorial. Makes perfect sense to me :)
ReplyDeleteI may need to try something similar in our house. Our two bookshelves are falling apart under the weight of our books and I need something that looks this pretty!
That is pure genius!!!! They look amazing!
ReplyDeleteGreat job! They look like they were custom made for the space.
ReplyDeleteI agree. Totally custom.
ReplyDeleteMr. Goodwill Hunting
Awesome! Btw, what paint color is on your wall. It looks so nice.
ReplyDeleteOMG! This is like...Secrets of Maillardville Manor. GREAT job on the shelves and the diagrams were very helpful.
ReplyDeletehaha love the term Billy Built-ins! Great idea having the centre pop out like that. I could sit in your library to chill out no problem!
ReplyDeletexx
Such a great project!
ReplyDeleteIkea "hacking" at it's finest ;-)
Victoria
That is such a great idea! If our home was more permanent I would totally do this!!
ReplyDeleteAbsolutely gorgeous!! You guys are doing a beautiful job. Love following the progress :))
ReplyDeleteAbsolutely stunning!!!!
ReplyDeleteI am so amazed. You've lived in your new house for like a month, while I've been in my house for over 3years and still doesn't look as good as this one room. What are your favorite, basic must-haves that make a room feel and look so put together!
ReplyDeleteI brought the ikea kids round talbe to use as a coffee table because it looked so nice in your livingroom.
ReplyDeleteTina
Thank you so much for all the Bookcase Love!
ReplyDeleteTo answer your questions:
The Paint Color is Mourning Dove it's a Martha Stewart Color!
Here's our post about that color:
http://www.maillardvillemanor.com/2010/12/paint-color.html
Jennifer-You just gave me a GREAT idea for a post! I'll write it up this weekend an post by Monday hopefully!
and Tina I'm so glad you liked the table!! It works pretty well for a coffee table :) I hope it's exactly what you were needing :)
Hi there! I just came over from Ikea Hacker, and I love your project. I've seen similar things done, with a base molding added made of a plain 1"x3" mdf board with cap and shoe molding over that made with quarter-round molding. It would really complete the built-in look, hide the plain Billy feet, help keep small objects from disappearing under the bookcases, and dust bunnies from breeding in there. :o)
ReplyDeleteThanks so much for sharing your project!
Briliant!
ReplyDeleteLooks like an expensive custom built-in.... Beautiful job!
ReplyDeleteWhat a great idea! It looks fantastic!
ReplyDeleteJust came over from Ikeahackers, I love this buit in, it's awesome! We've been thinking about doing something like this in our home and your tutorial is so helpful, thanks for the inspiration. I'm your newest follower.
ReplyDeleteHi! I love this bookcase and wanted to let you know that I featured it on my blog! Come stop by and take a look. Thanks again for the awesome inspiration. Sarah
ReplyDeletehttp://threeboys-home.blogspot.com/2011/02/what-makes-you-nervous.html
Oh my gosh thank you for posting this. I need to try this. I can't believe you started with bookcases from Ikea - they look so fabulous after being transformed.
ReplyDeleteJust wanted to share with you what your genius creation inspired: http://iheartorganizing.blogspot.com/2011/03/built-in-beauty.html
ReplyDeleteI linked back to you, thank you for your blog!
xoxo,
Jen
Hi! I just finished our customized Billys and featured you on the post. I found you awhile back when I was looking up library ideas. You have the best taste!
ReplyDeletehttp://sewgrown.blogspot.com/2011/08/homeschool-library-phase-one.html
Wow!!! Love these! Your house is darling!
ReplyDeleteHi I saw this over at ikea hackers - thought it looked great and wanted to post a comment here too, I really like the composition you have in front of the book cases, I think you need just a few accessories to bring in a little color and make it pop! But maybe that is in your plan?! Thanks for sharing! Where are the chairs from??
ReplyDeleteThank anonymous!
ReplyDeleteIf you check out our house tour, You'll see the pops of color :) great minds think alike :)
The chairs are from Stylus!
Thank you so much for your comment!
Let me know if there's anything else your curious about :0
~Ashli
Hi, We have a similar Billy layout, with the center shelves bumped out, but our end shelves are the tall ones. I can't tell from the pics, but did you use any trim where the bookcases meet side by side?
ReplyDeleteI'm so glad you posted what paint color matches the Billy white. You saved me from getting a big ol' headache trying to find the right white!
Hi Megan,
ReplyDeleteSorry it took me so long to reply,
We didn't use any trim where the bookcases meet side by side. If I was doing a really tall long expanse of billy bookcases I would but it didn't seem to neccessary here!
I hope that helped a bit!
~A
HI there!
ReplyDeleteI loved your project. Tanks so much for sharing the plans; you've inspired me. I just wanted to know what finish (is that the right term?) you used for your trim paint--eggshell, semi-gloss?
Thanks!
A
Hi A,
ReplyDeleteWe used a semi gloss :)
Hope that helps a bit
Lots of Love
Ashli
Great instructions, thank u!
ReplyDeleteDid you use the Billy veneer bookcase or wood?
ReplyDeleteI too love the multipurpose built-in bookshelf look and the added details at http://iheartorganizing.blogspot.com/2011/03/built-in-beauty.html and http://www.maillardvillemanor.com/2010/07/billy-bookcase-all-trimmed-out.html.
ReplyDeleteWhat was the cost for this project?
I'm so sorry William, I don't recall the price of the bookcases, but they are the BILLY bookcases from Ikea.
ReplyDeleteThe MDF was 1 sheets worth for $30 and the chair rail molding I believe was $1.35 a foot and we needed about 12 feet worth!
Hope that helps a bit
~Ashli
We used Billy Veneer Bookcases . . . I didn't know they made solid wood ones.
ReplyDelete~Ashli
Thank you! This is an inspiring solution. I really like the MDF on top. We have a similar set up but with the tallest versions and we have not added that. Occasionally things fall back down which means they are gone forever. :-)
ReplyDeleteWhat a great idea! It looks completely built in.
ReplyDeleteI love this - it would be great for a nursery too! Thank you!
ReplyDeleteThis is incredibly useful advice - thank you very much for sharing!
ReplyDeletewow it makes it so classy when you add all the extras, maybe my husband will work for food too!!! :) love this, thanks!!
ReplyDeleteAmazing job! I want to copy this!
ReplyDeletefound you on Pinterest. Pinned away... so glad to let me readers know about this practical diy. This is a great project. And, so glad to know about your blog! I invite you over to Fieldstone Hill anytime!
ReplyDeleteYour bookshelves are just as popular today as when you built them Ashli! I've got them linked to my DIY built-ins roundup post too today, for inspiration!
ReplyDeleteGreat idea. Quick question. How much height did you lose on your top shelf with the addition of the molding? I noticed your magazine holders are on the bottom shelf and wondered whether they would still fit on the top shelf now. Thank you for sharing.
ReplyDeleteHi,
DeleteWe keep the magazines on the bottom shelf because they are Seriously heavy haha.
I think we lost about an inch. But the shelves are all adjustable inside so you could always adjust them if you needed more room on the top shelf!
Hope that helps!
Ashli
They bookcases look great! Your tutorial was very well written and the pics are very helpful!Pinner in PA
ReplyDeleteHi!
ReplyDeleteI know this was posted awhile ago, but I am just starting a project similar to this (inspired by this very project!). I am curious just how you attached the bookcases together? Same with the top? Thank you and I have to say I saw this on Ikea hackers a long time ago and it stuck with me until I moved to a new place where I had the space to do this!
Thank you so much!
Sara
hi there!
ReplyDeletei really love your idea and i will try to do the same with the top, but i have a question: how have you done the "corners" of the top? so that it fits in so nice and you don't see any edges (i hope you know what i mean, you can see it in picture 5).
btw, i apologize for my english (i'm not a native speaker).
anyhow, many thanks in advance :)
Hi Ashli, Sorry about this off topic question, but was wondering if you could tell me a little information about the area rug in this room. I am looking for something similar for our living room, I love it-- it's not thick and seems to pull this space in wonderfully, Thank you :) p.s. Love the bookshelves by the way!
ReplyDeleteThis is great! I was going to buy an Xpedit unit to use in our bonus/play room but now I'm going to use this idea!!
ReplyDeleteQuick question -- what did you use to attach the MDF to the top of the Billy book cases?
Thanks for sharing your wonderful idea!
I love this billy bookcase hack...by chance could you share the measurements for the MDF board. You've inspired me to recreate this and it would be helpful if I had the measurement when I go to Home Depot this weekend. Thanks in advance!
ReplyDelete